When I picked up crocheting again after decades away, it wasn’t dishcloths or potholders that pulled me back in—it was Fred the Disco Dino from The Woobles, gifted to me through TikTok Shop. Rainbow yarn, sparkly vibes, and a top-down amigurumi pattern? I was hooked. But one thing tripped me up right away: how to make a magic circle. I tried every tutorial I could find, rewound videos, fumbled through loops that wouldn’t tighten—and for some reason, it just didn’t click. Until one day, after trying a variation I hadn’t seen before, it finally made sense. That tiny loop opened up a whole new world of crochet possibilities. If you’ve ever struggled with starting projects in the round, this post is for you. I’ll walk you through multiple ways to make a magic circle, share the tips that helped me, and troubleshoot the quirks that come with different yarns and techniques. Let’s demystify the loop together.
This post contains affiliate links. As an Amazon Associate and Walmart Creator, I earn from qualifying purchases. I may also earn a commission through other affiliate programs at no extra cost to you. I only share products I genuinely find useful or interesting.
🧶 What Is a Magic Circle?
A magic circle (also called a magic ring or adjustable loop) is a technique used to start crochet projects that are worked in the round. Instead of chaining a few stitches and joining them into a loop, you create a flexible loop that can be pulled tight—leaving no hole in the center. It’s especially useful for projects like hats, amigurumi, coasters, and motifs where a clean, closed center makes all the difference.
When I first tried to learn how to make a magic circle, it felt like a tiny puzzle. I was used to chaining four and joining with a slip stitch, but that always left a little gap in the middle. With amigurumi (like Fred the Disco Dino), that gap can feel like a flaw—especially when you’re working with bright yarn and tight stitches. The magic circle solves that beautifully.
✨ Why Use a Magic Circle Instead of a Chain Loop?
Here’s why the magic circle is worth learning, even if it feels awkward at first:
- No center gap: You can pull the loop tight so the starting hole disappears completely.
- Cleaner finish: Especially important for stuffed toys, motifs, and decorative pieces.
- More control: You can adjust the size of the loop before locking it in, which helps with tension.
- Professional look: It’s one of those small upgrades that makes your work look polished and intentional.
Chain loops still have their place—especially for looser projects or when you want a decorative hole in the center—but once the magic circle clicks, it becomes your go-to for seamless starts.
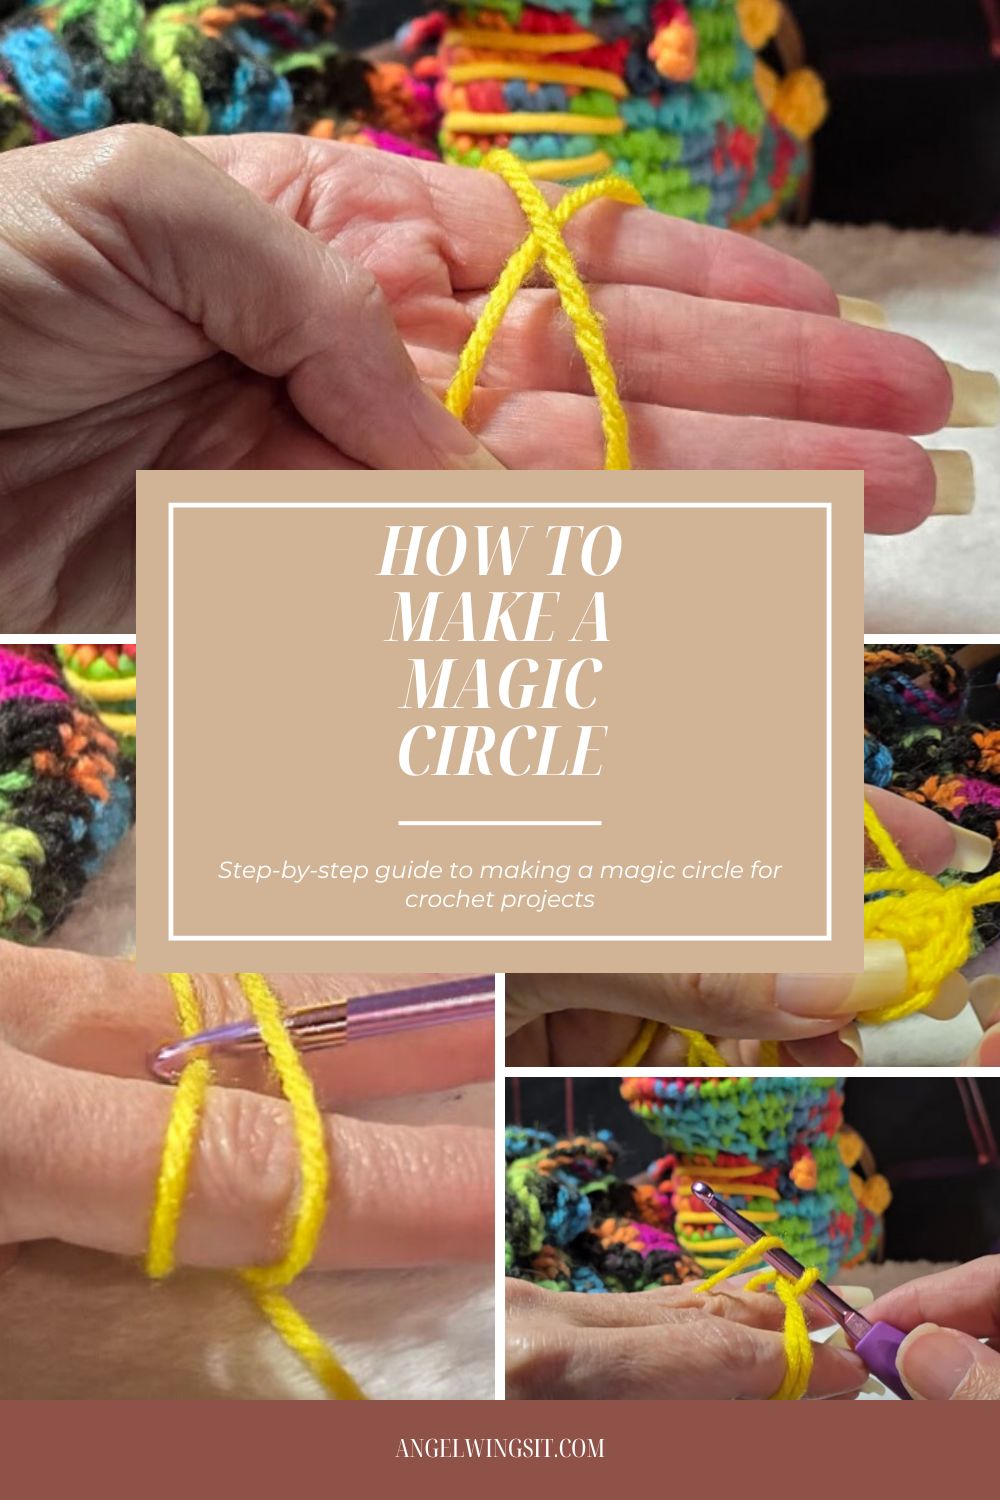
🧶 How to Make a Magic Circle (Step-by-Step)
This is the classic method I finally got to click—perfect for starting hats, amigurumi, and motifs with a closed center. You’ll need your yarn and hook, and a little patience if it’s your first time. Once it clicks, it sticks.
✨ Step-by-Step Instructions
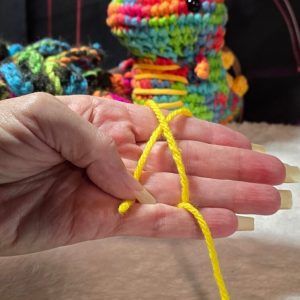
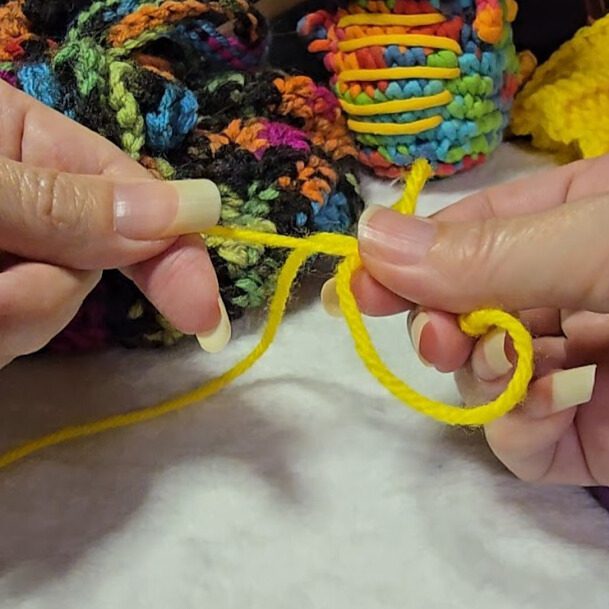
Step 1: Wrap the yarn to form a loop Hold the tail end of your yarn in your palm with about 6 inches hanging down. With your other hand, wrap the working yarn (the part connected to the skein) around two fingers—usually your index and middle finger—so it crosses over the tail and forms an “X” on the front of your fingers. The loop should be loose enough to slide off easily but snug enough to stay in place while you work.
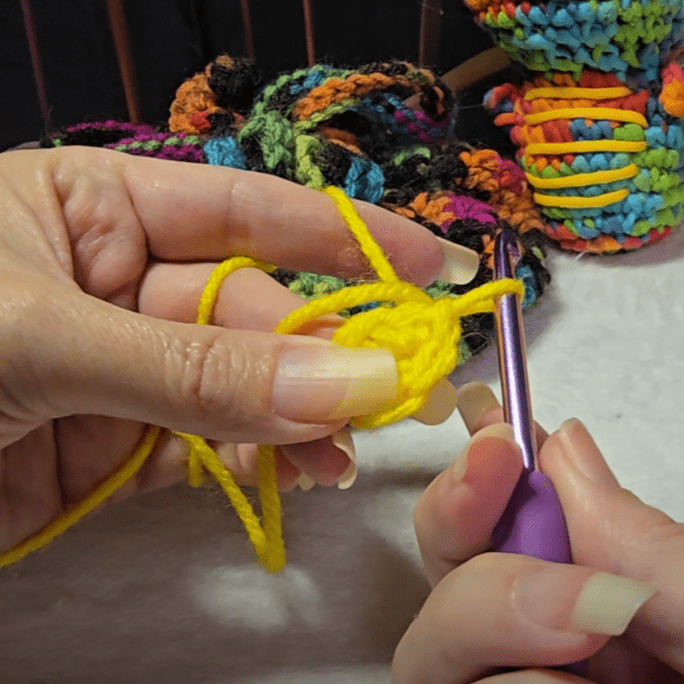
Step 2: Insert your hook under the front strand Slide your hook under the first strand of yarn (the one closest to your fingertips) and over the second strand (the one that crosses behind). You’re scooping the back strand with your hook.
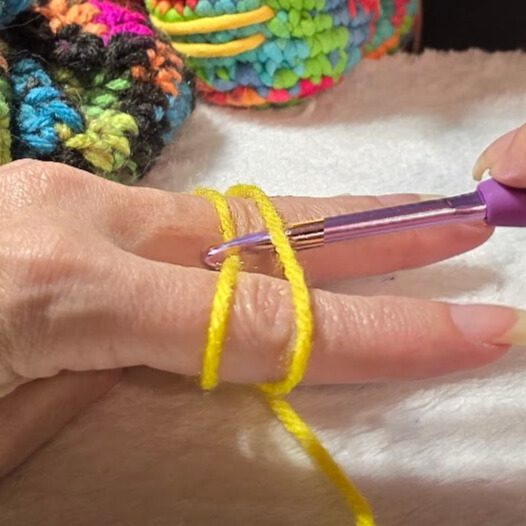

Step 3: Pull up a loop Gently pull the yarn through to create a loop on your hook. This is your working loop—the one you’ll build your stitches from.
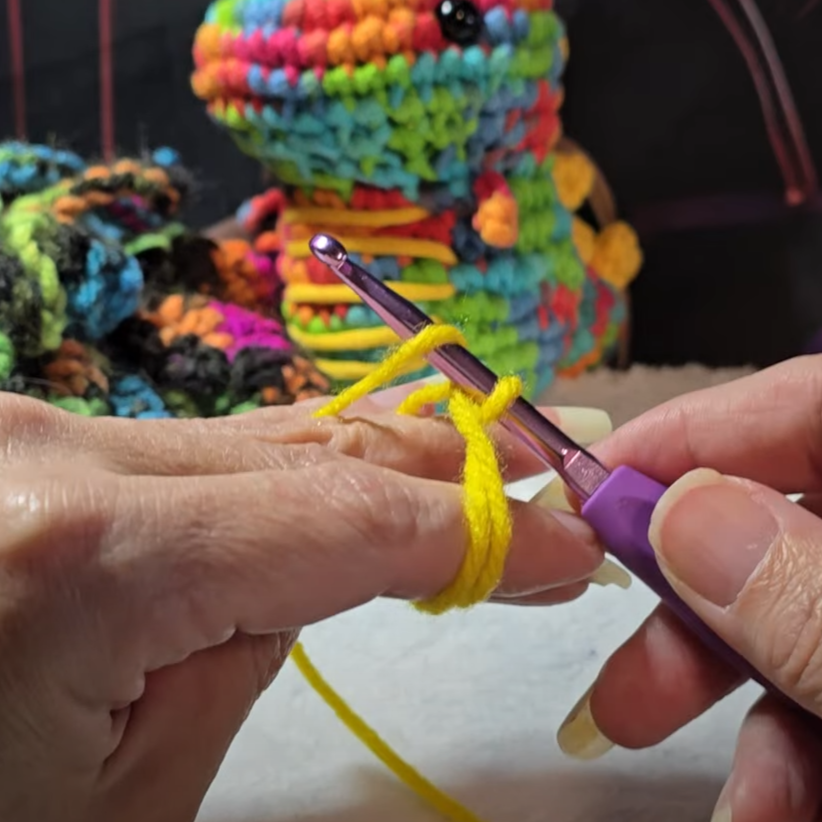
Step 4: Chain to anchor Chain 1 (for single crochet projects) or chain 2–3 (for taller stitches like half double or double crochet). Do this by going under the back yarn again with your hook and pulling through the loop on your hook. This anchors your loop and sets you up for the first round.
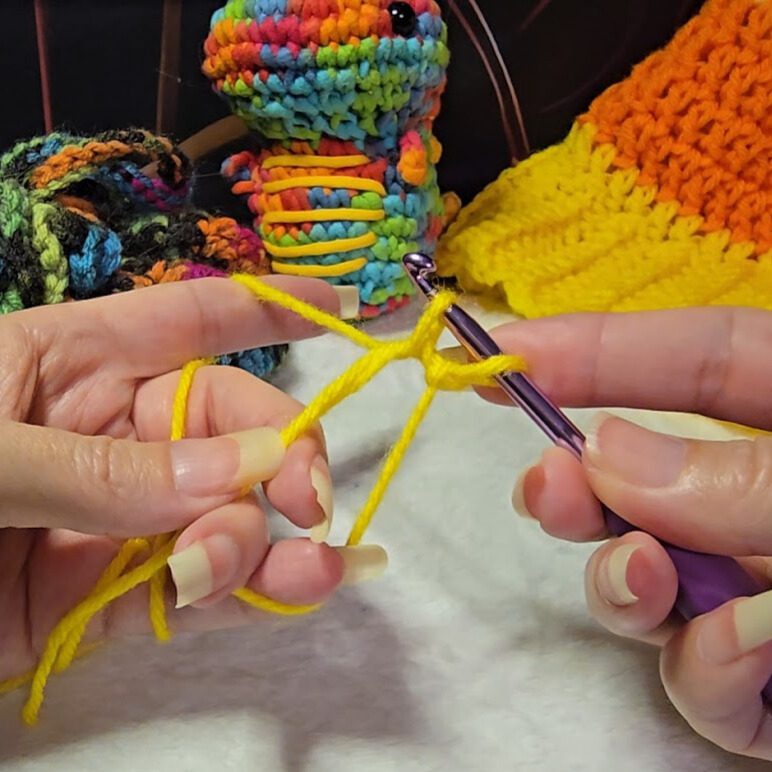
Step 5: Crochet into the ring Work your first round of stitches directly into the loop—around both strands of yarn. For example, if your pattern calls for 6 single crochets in the ring, insert your hook into the center of the loop, yarn over, pull up a loop, and complete your stitch as usual.
Step 6: Tighten the circle Once you’ve finished your first round, gently pull the tail end of the yarn to cinch the loop closed. You’ll see the center tighten beautifully, leaving no gap.
Step 7: Join the round (if needed) If your pattern calls for it, join with a slip stitch to the first stitch of the round. Some patterns continue in a spiral, so you may skip this step depending on your project.
🧵 Tips for Success
- Keep your tension relaxed—tight loops are harder to adjust.
- Practice with smooth, medium-weight yarn so you can see the loop clearly.
- If the loop won’t tighten, double-check that you’re pulling the tail, not the working yarn.
- For slippery yarns (like mercerized cotton or acrylic blends), try a double magic ring for extra grip.
✨ Magic Circle Variations: Find the Loop That Works for You
When I first came back to crochet, I didn’t realize there were multiple ways to make a magic circle. I kept trying the same method over and over, wondering why it felt awkward or why my loop wouldn’t tighten properly. Turns out, there’s more than one path to a snug, seamless start—and finding the right variation can make all the difference.
Here are five popular options, each with its own rhythm and personality. I’ve tried them all—and I’ll share which ones helped me get through those early rounds.
🧶 1. Standard Magic Circle (Finger-Wrap Method)
This is the classic method most tutorials teach—and the one I walk through in the step-by-step section above. You wrap the yarn around your fingers to form a loop, then crochet into that loop before pulling it tight.
How to do it:
- Hold the tail end of your yarn in your palm.
- Wrap the working yarn around two fingers to form a loop, crossing over the tail.
- Slide the loop off your fingers carefully.
- Insert your hook under the front strand, grab the back strand, and pull up a loop.
- Chain to anchor, then crochet your first round into the loop.
- Pull the tail to cinch the center closed.
Best for: Hats, motifs, amigurumi, and general use
Angela’s note: This method didn’t click for me right away. I tried it over and over—especially when making Fred the Disco Dino—but it always felt like wrestling a ghost. It wasn’t until I made five DC dice bags from Green Fox Farms Designs that it finally made sense. Something about the repetition and the need for a snug center helped it stick.
🧵 2. Double Magic Ring (Extra Secure Wrap)
This variation adds an extra wrap around your fingers before you start, creating a thicker, more secure loop. It’s ideal for yarns that tend to slip or for projects that get tugged a lot.
How to do it:
- Wrap the yarn around your fingers twice to form a double loop.
- Slide the loops off your fingers and hold them together.
- Insert your hook under both loops, pull up a working loop, and chain to anchor.
- Crochet your first round into both loops.
- Pull the tail to tighten both loops together.
Best for: Amigurumi, bags, and tight-stitch projects
Watch out for: Slightly bulkier center—great for durability, less ideal for delicate motifs
🧶 3. Slipknot-Style Sliding Loop
This method starts like a slipknot, but instead of tightening it right away, you leave the loop open and crochet into it. It’s less fiddly and easier to control, especially for visual learners or those with dexterity challenges.
How to do it:
- Make a loose slipknot on your hook, but don’t tighten it.
- Hold the loop open and chain to anchor.
- Crochet your first round of stitches into the loop.
- Once the round is complete, pull the tail to cinch the loop closed.
Best for: Beginners, teaching others, or quick-start projects
Angela’s note: This was my go-to for a while. It’s what got me through Fred the Dino when the finger-wrap method felt impossible. It’s intuitive and forgiving—and a great stepping stone if the classic magic circle isn’t clicking yet.
🧵 4. No-Gap Chain Loop Alternative
If magic circles just aren’t your thing, this method uses a short chain joined into a ring, then worked into like a regular round. You can tighten the center by pulling the tail through the stitches strategically.
How to do it:
- Chain 2–4 stitches, then join with a slip stitch to form a ring.
- Crochet your first round into the ring.
- Use the tail to weave through the center and cinch it closed.
Best for: Decorative centers or those who prefer traditional starts
Watch out for: May still leave a small gap—less ideal for stuffed pieces
🧶 5. Magic Circle with Stitch Marker Hack
Some crocheters place a stitch marker or safety pin through the loop before tightening to prevent it from pulling closed too early. It’s a great trick if you’re working slowly or pausing mid-round.
How to do it:
- Make your magic circle using any method.
- Before crocheting into the loop, place a stitch marker through the loop to hold it open.
- Crochet your first round, then remove the marker and pull the tail to tighten.
Best for: Slow stitchers, multitaskers, or tutorial filming
🧵 Magic Circle FAQ: Troubleshooting Common Crochet Issues
Q: Why won’t my magic circle tighten in crochet? A: You may be pulling the working yarn instead of the tail. To fix this, make sure you’re crocheting around both strands of the loop and gently pull the tail end after completing your first round. This will cinch the center closed.
Q: Why does my crochet loop tighten too early? A: If your magic circle closes before you finish your first round, try placing a stitch marker or safety pin through the loop to hold it open. This keeps the loop adjustable until you’re ready to pull it tight.
Q: How do I fix a gap in the center of my magic circle? A: If the center doesn’t fully close, switch to a double magic ring for extra grip or use a yarn needle to weave the tail through the center stitches manually. Some yarns, especially slippery ones, may need extra reinforcement.
Q: How do I keep my magic circle from coming undone later? A: After tightening the loop, secure the tail by weaving it back through the center or tying it to the first stitch. Using a longer tail (6–8 inches) gives you more room to anchor it securely.
Q: What if the magic circle feels awkward or hard to make? A: Try the slipknot-style sliding loop—it’s more intuitive and less fiddly than the finger-wrap method. Practicing with smooth, medium-weight yarn and a slightly larger hook can also help build confidence and muscle memory.
🍂 What’s Next? Try Your Magic Circle in a Fall Beanie
Now that you’ve mastered how to make a magic circle (or found the variation that finally clicked), it’s time to put that loop to work. My Fall Crochet Beanie Patterns Roundup features beginner-friendly designs that use simple stitches, soft yarns, and cozy textures—many of which start with a magic circle. Whether you’re stitching up a striped beanie, a slouchy ribbed hat, or something inspired by candy corn and crisp mornings, these patterns are perfect for practicing your new skill. Grab your hook, pick your favorite, and let the fall stitching begin.
🧶 Final Thoughts: When the Loop Finally Clicks
Learning how to make a magic circle isn’t just about mastering a technique—it’s about finding your rhythm, trusting your hands, and giving yourself space to grow. Whether it clicks on the first try or after five dice bags and a rainbow dinosaur, it’s a moment worth celebrating. I hope this guide helps you feel more confident starting your crochet projects in the round—and if you’ve got a favorite variation or a “finally got it” story of your own, I’d love to hear it. Drop a comment below and let’s cheer each other on, one loop at a time.